How to get Started with OMD and Check_MK

Check_MK_logoIn the past it was in some cases a hard task to setup a monitoring suite and get it running.  Commercial and open source tools where not very user friendly and often lagging a good usebility. I remeber the early days of tools like HPOpenView and Nagios. Luckely times have changed and today you can have your monitoring up and running in a few minutes. I am a big fan of OMD and the Check_MK frontend developped by Mathias Kettner. I show you the steps that are needed to get OMD up and running.

First you have to download the software package:

http://omdistro.org/download

From the project download page you find packages for Debian/Ubuntu, RHEL/CentOS and SUSE.

In my example installtion I used Ubuntu Server.  So lets get started.

First I install two additional packets:

apt-get install gdebi
apt-get install apache2-mpm-prefork

Now we can start to install the OMD package that we have downloaded from the OMD homepage.

gdebi omd-1.20.wheezy.amd64.deb

After the installation the OMD commands should be ready to use.

The first task is to create a omd site. The concept behind it is that you can have multiple sites on the same server so e.g. you can create a site network and a site server. The benefit is that you can do separations for different IT departments or locations. It is also always a good idea to create a test site. Note all OMD commands need root privlidges.

omd create "site name"

The basic configuration for the site that we have just created can be accessed with the command:

omd config "site name"

Check_mk_menu Check_mk_addons

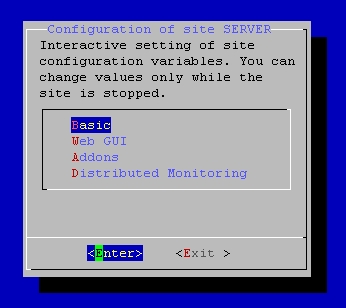
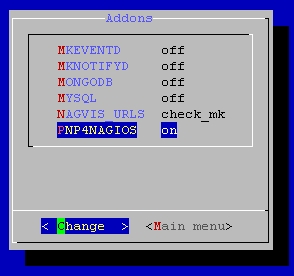
It is a menu based configurator where you can change the basic settings for your site. I use as the Default_GUI check_mk. If you like addtional addons you can also activate them here. I enabled here NAGVIS wich provides grphical maps and vsiulization for your monitoring and PNP4Nagios that provides grphical statistics.

So lets start our new site:

omd start "site name"

Now we can connect to our site via HTTP

http://127.0.01/„site name“/check_mk/

The default credentials are

User: omdadmin

PW: omd

Check_MK_gui_1

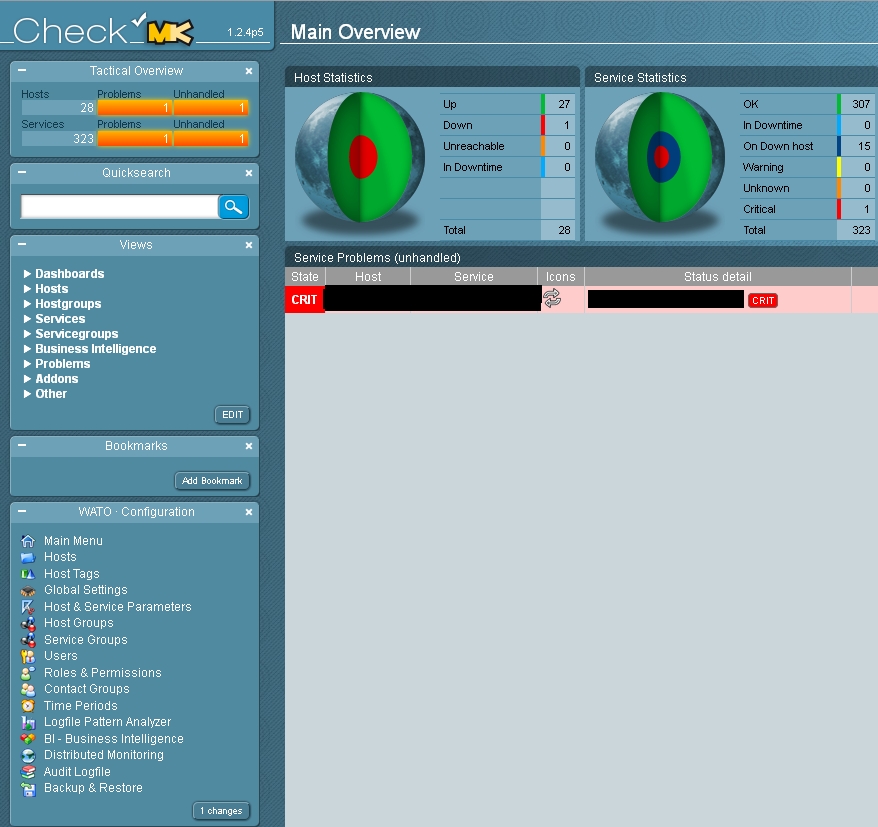
From this point you can configure all further settings from the web frontend. With Check_MK you have a powerfull gui that can be customized by the user. You have on the left side a so called snapin menu. With the button on the left down side you can add or remove snapins wich can gave you access to extra addons like NagVis or BI. Compared to the config file based configuration from the classic nagios this is much more easy to handle.  Adding new hosts is also done very quick with the copy function from the gui. Once you have created a host it is possible to copy this host simple change the name , alias and IP address and you have a new system in the monitoring configured. From the hardware prospective OMD runs on very small boxes like a Rasberry Pi. Here it really depends how many devices and checks you are running on your server.

Try out OMD distro and leave a comment about your impressions here if you like.

Cheers

Posted in All, Howto, Monitoring | 9 Comments

SPB Basic configuration with Avaya switches

vsp7kI was really impressed as I started my first SPB configuration on an Avaya switch, I had a 200 lines MPLS like configuration in mind and was surprised that you do not need a lot of commands to setup SPB. I walk you through the basic steps that you need for SPB. Here in this post I will only cover  the basic setup.

First you need to enable SPB globally to get started, this requieres a reboot on the VSP7k and the ERS4k. At the ERS8k you need a premier license to get started.

spbm

After that command  the device will reboot and come up partially defaulted, so that will be the first step to enable SPB. For the VSP7k to enable SPB on the rear-ports it also requieres a reboot, it can be applied with that command:

rear-port mode spbm

In the next step we have to create 2 SPB backbone VLANs. You can choose any VLAN ID you like. It is recommanded by Avaya to use 4051 and 4052.

vlan create 4051 name SPBM-1 type spbm-bvlan
vlan create 4052 name SPBM-2 type spbm-bvlan

Than give your device a name. The sys name that you see on the CLI prompt is also used in SPB for L2 pings and trace routes. Here you should use something that is human readable.

snmp-server name VSP7k_10

Now we go to the router ISIS configuration and configure the area. BTW the 49 has nothing to do with country dial up code for Germany. It is the default area that we are using here. The system-id and nick-name have to be unique in your network. You can choose what ever you want, but make a good documentation of what you have done to prevent that never 2 devices uses the same ID. I usually borrow the numbers from the device IP adress for example the switch management IP would be 10.10.10.10 than I translate these digits into the nick-name and system-id.

router isis
 manual-area 49.0001
 system-id 0010.0010.0010
 spbm 1
 spbm 1 nick-name 10.10.10

Now we have to enable isis:

router isis enable

The last step would be to enable SPB on the interfaces that you would like to use. It can run on a single interface or MLT. You only need dot1q encapsulation or tag all in Avaya terminilogy enabled on the particular ports or trunks.

interface Ethernet 1/1
isis
isis spbm 1
isis enable

Note on the VSP7k it is only interface “ethernet” this can be diffrent like e.g. interface gigabitEthernet on the VSP4k depending on the device type and software.

Thats the complete basic configuration, your device is ready now to connect to anonther switch with an SPB configuration on port 1/1.

When you connect two switches with an SPB enabled interface with each other they will form up an adjacency

show isis adjacencies
================================================================================
 ISIS Adjacencies
================================================================================
INTERFACE L STATE UPTIME PRI HOLDTIME SYSID HOST-NAME 
--------------------------------------------------------------------------------
Mlt1 1 UP 22:20:11 127 21 0010.0010.0012 ERS-12
Port1/1 1 UP 10:12:45 127 22 0010.0010.0010 VSP7k-10
Port1/2 1 UP 10:12:45 127 22 0010.0010.0011 VSP7k-11


Now you can create services that run over the SPB fabric like e.g. VLAN 2000 will mapped into I-SID 20002000 as a L2VSN service.

vlan create 2000 type port 1
vlan i-sid 2000 20002000

You can move an access port into VLAN 2000 that will be transported over the I-SID 20002000. On Any other SPB enabled switch in your network you would only type the two commands above and also add an acces port to VLAN 2000 that would provide L2 connection between these two acces ports. It is possible to use different VLANs on different switches, as long as the I-SID ID is the same you will have a connection. There are no configurations needed on any uplink ports no matter if the switches are directly connected or any number of switches are between them in the nwtwork path. In the moment you create the I-SID SPB will provide the shortest path across the network.

Posted in All, Avaya, Howto | 9 Comments

SPB an Overview

This will be the first blogpost of a series of posts about SPB. We start with an general overview. At the moment there are big changes in the network industry. After using protocols like spanning tree for over a decade technology has evolved and fabric based solutions can do today all the stuff that we couldn’t do with spanning tree. Of course an Ethernet fabric is much more than just an upgrade of spanning tree. The two standards for Ethernet fabrics are TRILL and SPB.  I will try to get you an overview what SPB is and how it works. SPB stands for shortest path bridging and is the IEEE standard 802.1aq. There are two versions of SPB the SPBM and SPBV standard, at the moment it looks like that only SPBM is adopted by vendors and everything posted here will regarding to SPBM.
With SPB you can build large loopfree multipath equal cost topologys. That is achieved with the ISIS and the dijkstra algoryththm as controlplane in the backround.
Think of it like routing for MAC Adresses. Some of the behaviour that we know from L3 Routing can applied with SPB for MAC addresses on L2. So like we did in L3 routed networks you can use all physical layouts like star, ring, full mesh, squre or what ever you like. In this network all path will be used there will be no blocked or unused path. It is also impossible to have a loop in a SPB network. We also get with SPB some features that are a littlebit similar to what we have done in the path with MPLS. Packets that will be forwarded across your SPB fabric will become an extra “TAG” like the label in MPLS, when the packet is forwarded to its destination the “TAG” is removed on the access switch, so your SPB network will always look like one hop for connected hosts. The second benefit is that with the encapsulation process is added an service identifiyer or I-SID that brings us 16 million service IDs and eleminates the limit of 4000 VLAN IDs. On SPB you can run different services , so once SPB is running on a network you can configure the services you like to utilize. I will use here the Avaya terminologys for the services.

L2VSN: a virtulized layer 2 service over SPB, like a VLAN on conventional switches you can transport L2 connectivity over the SPB fabric. On the acces site VLANs will be mapped to an I-SID. The VLAN ID is only local significant here so you can map on different access switch a different VLAN IDs to an I-SID only the I-SID must be the same gloablly to provide L2 connectivity across multiple switches.

IPShortcut: a Layer 3 service over SPB using ISIS for routing for the Global Routing Table GRT

L3VSN: a virtulized Layer 3 service over SPB. Think of it like the vrf feature in MPLS. Multiple L3 services in diffrent vrfs.

Multicast: a virtulized L3 multicast routing service. In the past you needed addtional protocols like e.g. PIM for multicast routing. SPB has multicast routing onboard so you just need to enable it and have multicast routing over SPB.

T-UNI: the T-UNI is a subcategory of the L2VSN, wich I call the virtual cable. Basicly it transports everything as long it is ethernet from one given access port to another across a SPB facric.

My opinion on SPB: 

SPB is a straight forward protocol wich is easy to deploy and works extremly reliable. I have to admit that I was very sceptic (I am always sceptic when it comes to brand new stuff that nobody has tried before) when I started to investigate SPB in 2013. I really got excited about SPB after a 2 days workshop. After only 2 days of testing SPB in the lab I felt comfortable with the technology. Once SPB was rolled out on the lab equipment I tried everything I could thought of to break it, but SPB has not failed a single time. Most of the simulated failures where handled and converged by SPB so fast that it was hard to measure them. Based on my expirience I can also say that with SPB you have to spent less time to configure your network.SPB_PP

When you got interested in SPB you can also listen to the Packet Pushers Podcast Episode 210 SPB Implemtation Fundamentals, where I had a nice discussion with Rikki Cook, Ethan Banks and Greg Ferro about SPB.


http://packetpushers.net/show-210-spb-implementation-fundamentals/

Posted in All, Avaya, Blog | Tagged | 7 Comments

Dusty Routers

The best enviroment for ndusty_switch
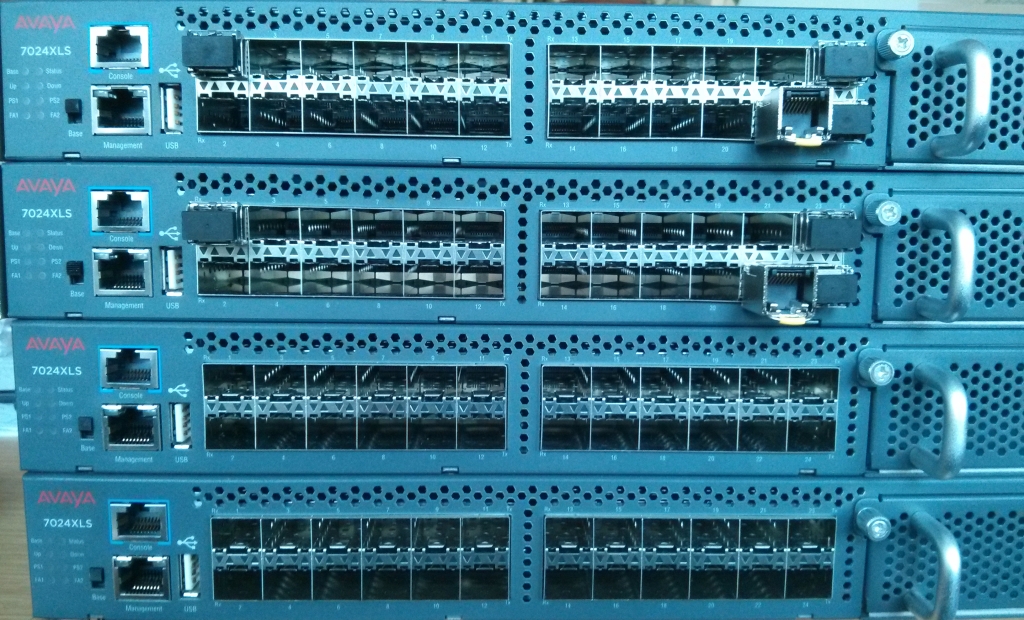
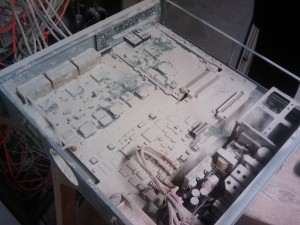
etwork gear is a cooled and clean rack. In the real world it is many times the opposit warm and dusty. Many vendors advise you to clean the fans on regular bases to prevent poblems with the air based cooling. Most network engineers have seen pretty wild thinks when it comes to not optimal enviroments. I worked in a industrial facility where they had a lot of dust it was nearly everywhere. Really amazing that the modular Avaya Cajun Router and the 2RU Cajun access switch that you can see on the pictures have survived these conditions and worked without any issues for years. All the white powder on the IO board that you can see is industrial dust that nearly covered everything with a thick layer including all the optical components.

dusty_router
Do you also have seen network gear working in ruff conditions, please leave a comment.

Posted in All, Blog | Leave a comment

Network Monitoring #1

This will be the first post of a series of blog posts about network monitoring.

Most people that work in IT know the situation when you get a call and someone is blaming you that nothing works and you have no knowledge of what is going on.To be prepared for the “It´s always the networks fault” calls you need to have a good monitoring systme in the backhand so that you can give the correct answers after you had a short view on the monitoring system. IMHO to run productive systems that are not monitored is a big gamble that is not nessessary with a littlebit of effort you can monitor all the devices that you a responsible for and have always a good feeling what is going on for the case someone calls you. In the past it was really hard and expansive to get a monitoring system up and running. Opensource monitoring systems where here a real game changer. It also needed time in the open source community to develop reliable and feature rich solutions that also has a good usebility. I remeber the first versions of Nagios that where not so easy to maintain. I have to admit that also in the commorcial tools development has brought to us some goog monitoring solutions.My personal recommandation in the moment is OMD the Open Monitoring Distribution.

http://omdistro.org/

In OMD included are sevral open source monitoring tools. The two main buncle-sam-open-source-311x400enefits are that you can install everthing with just one packet. All the included tools are maintend and tested togehter so that you can update the complete package without having concerns that the update of one tool will brake an other tool. I had that issue many times in the past. Think of OMD like a complete monitoring toolbox that gives you everything that you need for starting your monitring server.

I was recently a guest at the Packet Pushers Podcast and had the pleasure to discuss open source Monitoring with the Packet Pushers hosts Ethan Banks and Greg Ferro. In show 205 you get an good overview about OMD.

http://packetpushers.net/show-205-open-source-network-monitoring-omdistro-org/

What is your favorite monitoring solution? Please leave a comment .


Posted in All, Blog, Monitoring | Tagged | 1 Comment

Air Console the cable free serial adapter

Most networkers even when they are only do consulting have in their pocket for travelling at least one RS232 serial adapter. Back in the days I had a big pack with many different adapters, crossover serial cables und gender changers always in my bag. On most modern laptops you will not find an RS232 jack anymore. I used for quit some time a serial to USB adapter. With an OTA cable it was also possible to connect the Serial USB adapter to my Android Tablet or Smartphone. But at the end of the day you are in a very unconfortable position in the hot aile inside of a datacenter and the cable is not long enough to reach the phone wich is two racks awy from you.  So I was searching after a wireless solution that works with a Laptop, Smartphone and Tablet as well. “One to rule them all”. At XMAs arrived the Air Console from getconsole. It is a very clever device that has everything I was looking for.

air_console

Features:

-Access Serial Ports over WLAN

-Access Serial over Bluethooth

-Bridge Ethernet wireless to Wired interface

-OS Support for Android, Apple IOS, Windows, Linux

-12+ hours of battery life (device is charged over USB so it is even possible to charge it on one of the modern switches with USB interface)

I tested it with several devices from diffrent vendors and so far I got to all of them a connection without any issues. I also like that I have my small air console in the pocket and for a short configuration like e.g. a reboot I simple use my smartphone and there is no need for a full sized laptop. I admit that I would not like to do a 200 lines MPLS configuration with my smartphone, but for that I can also use my Laptop with the airconsole. Another additional feature is that you can use the air console for charging , so e.g. get some extra juice for your smartphone when your battery is nearly dead. For Android you get the SerialBot app for free in the playstore. As always in the apple world it will cost you some extra cash to get the app.

https://play.google.com/store/apps/details?id=nz.co.cloudstore.serialbot

For Android devices I also recommand the Hacker´s Keyboard App wich brings you a full size Keyboard with TAP, CTRL, ESC and all the keys that are not included in the standard android keyboard.

https://play.google.com/store/apps/details?id=org.pocketworkstation.pckeyboard

The air console wireless serial adapter is available in 3 version std, pro and XL. The XL version has 12 hours bettery life and the Std and pro 5 hours.

Here is an overview of all the available versions:

http://www.get-console.com/shop/en/16-airconsole

After one month of using the air console I am still very happy with it and would not like to go back to a wired serial connection. The gretest benefit is the flexebilty when you are on the run to connect nearly with any device you have available at that moment.

What is in your network combat back when you travel around ? Please leave a comment.

Posted in All | 2 Comments

DHCP Relay Problem with Avaya ERS5000 SW 6.3

I recently stumbled upon a problem with the Avaya ERS5000 switches. The problem was quiet odd , so I would like to share my expierence and hopefully help somone with troubleshooting this problem.

On a given network where a ERS5000 is the core switch and also did the L3 routing for the network I updated from SW 6.2.x to 6.3.4. In my case I had a switchclsuter the update process had worked probably and with a switchcluster for the users there was only a short second outage during the update process.  I made some test after the update and found out that the clients can not receive an address over the DHCP server anymore. With manual configured IP adresses everything worked fine, only DHCP was not working. The DHCP relay agents where configured and active on the ERS5000.

After digging into the release notes of SW 6.6 I found this documented issue:

In some previous software releases of the Stackable
ERS platforms (ERS 2500, 3500, 4000 and 5000
Series) as well as the VSP 7000, a software issue
was found to cause malformed DHCP packets as
they were forwarded out of the switch.
In the software releases listed in the preceding row,
a code change has been made to stop the
malformed packets from being generated and also to
discard these malformed packets if the switch is
receiving them.

Avaya recommands to upgrade the Acces switches wich are connected to the ERS5000 to resolve the issue.
The issue is related to the feature combination of DHCP relay agent and DHCP snooping or NonEapPhone Authetication.

Here are the the switches that have to be upgraded to resolve the issue:
• ERS 25xx: 4.4.3.
• ERS 35xx: 5.1.2, 5.2.x
• ERS 4xxx: 5.6.4, 5.7.1, 5.8.x
• ERS 5xxx: 6.2.8, 6.3.3, 6.6.x
• VSP 7xxx: 10.3.2, 10.4.x

So if you are planing to upgrade a ERS5000 that is using the DHCP relay agent feature take care that you also update the connected Access switches at least to the version mentioned above. The odd think about this issue is that the older 6.2.x code for the ERS5k works with the malformed DHCP packets without any issues.
In my case I had planed to update 2 core switches and ended with an Update 30+ accesswitches.


Posted in All, Avaya | Tagged | 2 Comments

How to Upgrade an Avaya VSP4000

Here is a short overview how to upgrade a VSP4000. The procedure is the same for the VSP8000.

VSP_4450GSX

First you have to Uplooad the needed files, wich I do here via USB:

copy /usb/VSP4K.4.0.0.2.tgz /intflash/VSP4K.4.0.0.2.tgz
copy /usb/VSP4K.4.0.0.2_modules.tgz /intflash/VSP4K.4.0.0.2_modules.tgz

When you have the needed files in this example SW Version 4.0.0.2 on your Device you can start to add the software.

software add VSP4K.4.0.0.2.tgz

For encryption like ssh and snmpv3 you also need the modules file:

software add-modules 4.0.0.2.GA VSP4K.4.0.0.2_modules.tgz

When the sowftware files are completly added you can activate the software, after this is completed your VSP will reboot.
After the reboot the VSP will come up with the new SW version. To make sure that everything is ok we use a show command.

sho software
================================================================================
software releases in /intflash/release/
================================================================================
4.0.0.0.GA (Backup Release)
4.0.0.2.GA (Primary Release)

--------------------------------------------------------------------------------
Auto Commit : enabled
Commit Timeout : 10 minutes

The default settings make a auto commit of the sofware after 10 minutes. You can also do that manually with the command:

software commit

Cheers

Posted in All, Avaya, Howto | Tagged , | 8 Comments